Assign a POS Tax to a Tank
Most of the time the tax you apply when you sell one of your products is based on the location of your business. This is known as a Point of Origin tax. However, you may also have products (like tank rentals) where the taxes are applied based on the location of the customer. This is known as a Point of Sale (or POS) tax. If this is the case, it's a three step process to make sure the appropriate tax is associated with the appropriate product at the appropriate tank location.
Set up the Company Preference for POS taxes
From the Lynx Main Menu . . .
1. Left-click on Company and a drop-down menu will appear.
2. Left-click on Preferences.
3. This will display the Company Preferences window.
4. Select "Yes" to this preference:


When you choose "Yes" to this preference, two things will happen:
1. On the Add, Change, Delete Product window, when you left-click the
tab, a "POS" column will now appear at the far right. This will allow you to "check" the price that you want POS taxes to apply to. That is, anytime this price is used, the POS taxes for the stop will be applied (instead of the account "Preferences" taxes).
2. On the account window, when you go to an account and left-click the
tab, a POS Taxes tab will now appear. Left-click this tab to show the POS taxes that apply.

5. When you're done, left-click the  button.
6. Left-click the close button  to return to the Lynx Main
Menu.
to return to the Lynx Main
Menu.
Set up the product prices for POS taxes
From the Lynx Main Menu . . .
1. Left-click on Inventory.
2. A drop-down menu will appear.
3. Left-click on Find a Product.
4. This will display the Find a Product window.
5. Scroll down the products until you find the one you want to apply POS taxes to and double-left-click on it.
6. This will display the Add, Change, Delete Products window.
7. Left-click the tab which will display all of the prices for this product:
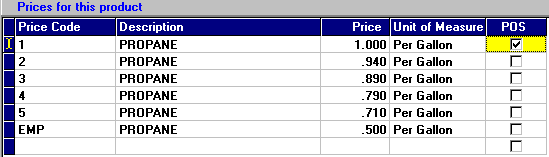
8. Check the price(s) to which POS taxes will apply by left-clicking the
 box.
box.
9. When you're done, left-click the close button to return to the Lynx Main
Menu.
Set up the tank that POS taxes apply to
1. Find the account you want to assign the POS taxes to by using one of the following:
People Associated with an Account
2. Regardless of how you get to the account, the detail account screen for that customer will be displayed.
3. Left-click the tab.
4. Left-click the  tab.
tab.
5. Left-click the down arrow  at the right of the Tax Group text box
 which will display a drop-down list of all your Tax Groups.
6. Left-click on the Tax Group you want to be assigned to this account. The individual taxes associated with that Tax Group will immediately be displayed below.
If you don't see the Tax Group you want to assign to this account, you will have to Add a Tax Group first.
7. When you're done, left-click the close button to return to the Lynx Main
Menu.