Add a Dummy Tank to an Account
This is a procedure that allows you to set up a tank in the system BEFORE you know what the actual tank serial number is.
The idea is to set up a "dummy" tank and then (later) swap this out for the actual tank once it's set in the field and it's serial number is known.
Doing it this way allows you to set up Service Orders, assign a route, enter delivery addresses, add appliances, add taxes, add meters, choose a routing method and set up tank rent without having to keep manual notes or having to wait until after the fact to enter this information.
1. Find the account that the "dummy" tank will be added to by using one of the following:
People Associated with an Account
2. Regardless of how you get to the account, the detail account screen for that customer will be displayed.
Left-click on the .gif) tab which will display the tanks screen for the account.
tab which will display the tanks screen for the account.
3. Left-click the  button and then left click on:

4. This window will be displayed:
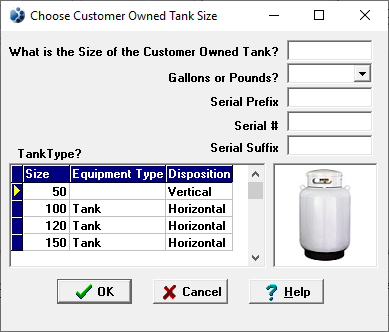
5. Key in the size of the "dummy" tank and select whether it's gallons or pounds. In addition, you may want to enter the words "New set" or "Dummy" (or something else that's meaningful to you) in the Serial Prefix field to further help identify the tank.
6. Left-click the  button
and the Location Info tab window will appear. Enter the
pertinent location, routing, propane safety check(and additional tabs within), tax, and meter information
about this tank by going from tab to tab.
button
and the Location Info tab window will appear. Enter the
pertinent location, routing, propane safety check(and additional tabs within), tax, and meter information
about this tank by going from tab to tab.
When the actual tank serial number is known
1. Go to the customer account, select the dummy tank, left-click the button and then left-click:
2. The Add or Remove a Tank window will be displayed.
3. Left-click on the tank in the right hand column to be added to
the account and left-click the "dummy" tank in the left hand column. Then left-click the  button.
Note: The new tank will immediately be added to the account in place of the "dummy" tank and the "dummy" tank will disappear. All of the information about the "dummy" tank will now be assigned to the "swapped" tank.
4. Left-click the button
which will take you back to the account.

If you ever want to see how many "dummy" tanks you have, go to Tank Reports and select report TR01 (Tank List by Account). Use the "Owned By" filter and enter "Dummy" in the FROM and THRU fields" and then print the report.
To see an example of formatting this report, click here.
